Assignments
Bucky Roberts: MySQL Database Tutorials – Week 10 (03/27/2017)
The YouTube series on MySQL by Bucky Roberts introduces the basics of MySQL, including the commands, clauses, operators, and keywords of Strucutred Query Language (SQL), the language used to retrieve, store, and manipulate data in databases. As the next assignment–PHP and MySQL for Dynamic Web Sites–will show, there are several MySQL clients. Because Bucky Roberts uses phpMyAdmin in cPanel for the tutorials, I was able to easily follow along.
After viewing all of the videos, I now have the requisite knowledge to run queries that create, delete, and modify databases, tables, and records. I also now know how to retrieve selected records. In addition, I now know how to use functions to manipulate data, as well as how to use operators for evaluation. This knowledge will prove to be useful in later assignments when I have to combine MySQL and PHP, utilizing PHP functions to connect to a database server and interact with tables in that database using queries.
Three examples of the materials learned from the tutorials may be viewed below the video: wildcards, outer joins, and regular expressions. These particular examples have been selected because I found the material to be comparatively trickier than the rest.
Example: Wildcards
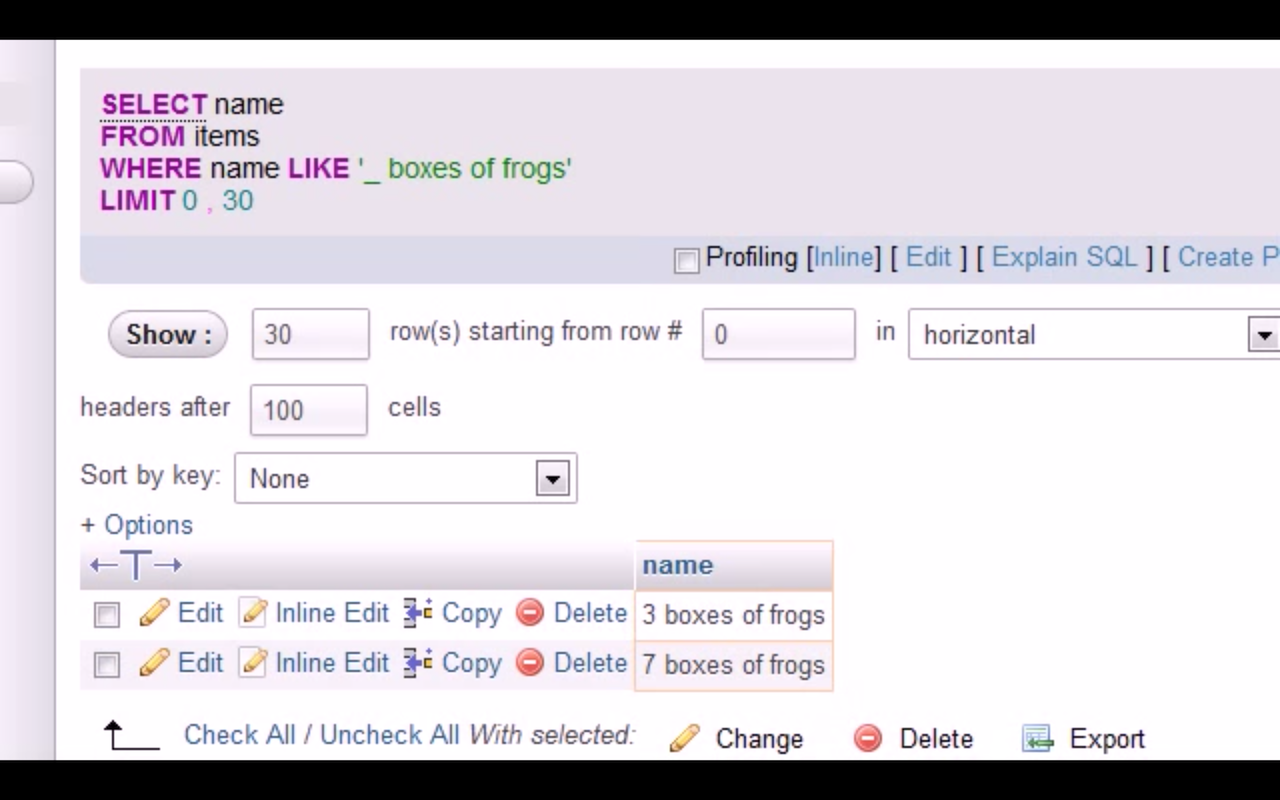
In Tutorials 13 and 14, Bucky Roberts goes over the ins and outs of using wildcards. The LIKE operator allows the use of two wildcards: percent sign, %, and underscore, _. The percent sign represents zero or more characters, whereas the underscore represents a single character.
Below is a screenshot illustrating wildcards in action (click thumbnail to view full size image). Here, because a single underscore is used, the only results shown are those with one character in that place. A double-digit number of boxes of frogs, for instance, does not show.
Example: Outer Joins
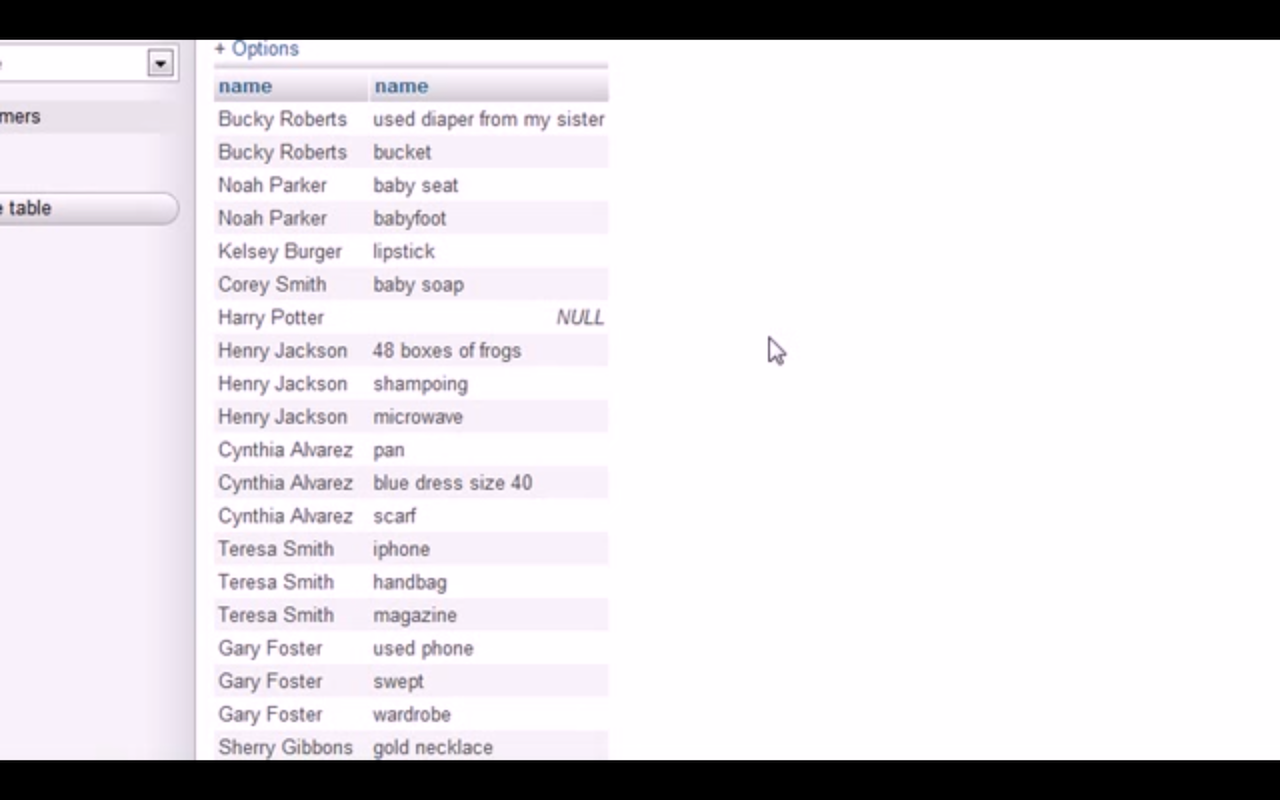
In Tutorial 23, Bucky Roberts demonstrates how to use an outer join to combine rows from two tables based on a common column, even selecting records that are not perfectly matched. By using LEFT OUTER JOIN, he is able to select all the records from the left table, in addition to the matching records from the right table. Conversely, if he had used RIGHT OUTER JOIN instead, he would have been able to select all the records from the right table, in addition to the matching records from the left table.
Below are screenshots showing how LEFT OUTER JOIN works (click thumbnail to view full size images). Here, the selected records are all the records from the left table (customers), plus the matching records from the right table (items). NULL appears if there is no match.

Example: Regular Expressions
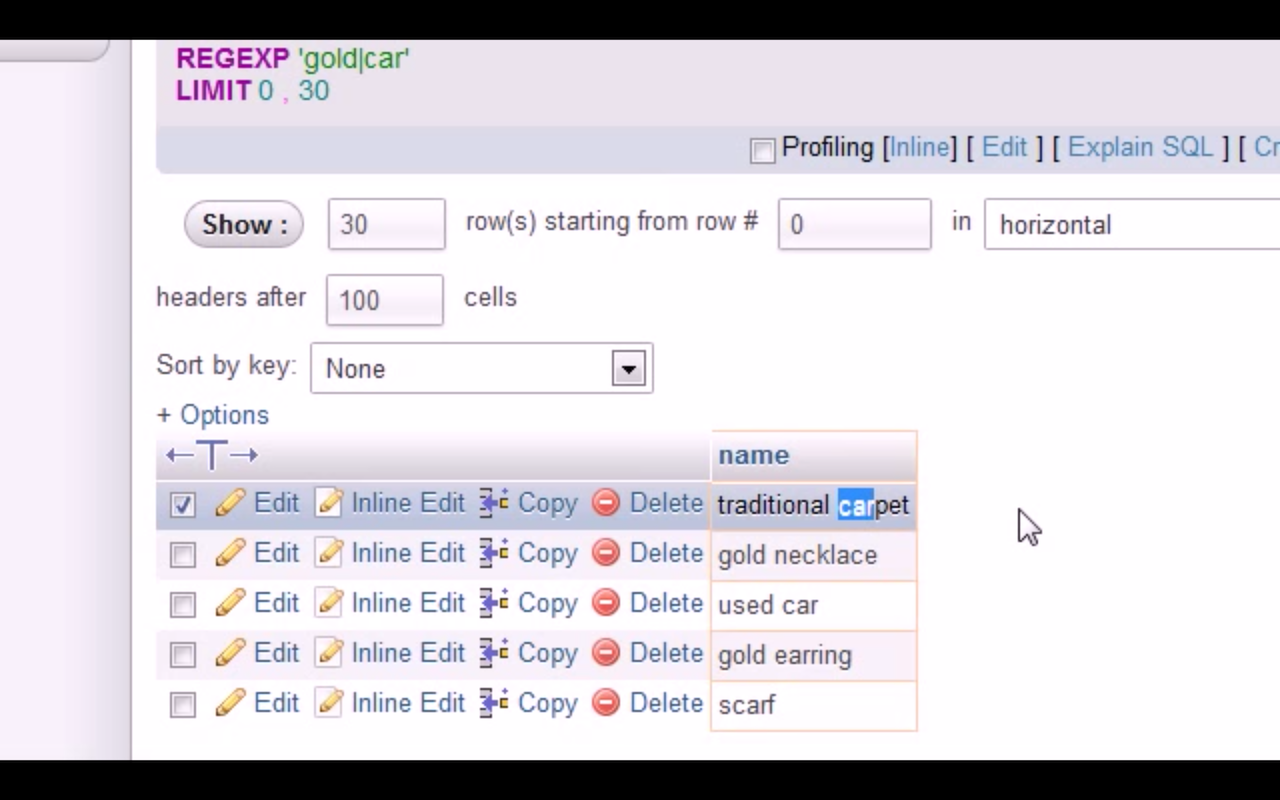
In Tutorial 15, Bucky Roberts teaches how to use regular expressions to specify a pattern for a complex search. Special characters may be used for more sophisticated searches.
Below is a screenshot demonstrating the REGEXP operator (click thumbnail to view full size image). Here, the pipe symbol, |, is used so that any records containing either of the strings "gold" or "car" will be selected.
PHP and MySQL for Dynamic Web Sites – Week 10 (03/27/2017)
The fourth, fifth, and ninth chapters of PHP and MySQL for Dynamic Web Sites, Fourth Edition by Larry Ullman review much of the same materials covered in the previous assignment with Bucky Roberts' YouTube tutorials, including the basics of MySQL, SQL, and their integration with PHP to develop dynamic web pages capable of interacting with a database stored on a server. Many examples of web pages that utilize these technologies are created and demonstrated in each chapter's lessons, which I was able to easily follow along with the step-by-step instructions provided.
The fourth chapter discusses the basics of MySQL, including the conventions of naming database elements; the structure of databases and how components relate to each other (e.g., tables, columns, and rows); the properties of columns (e.g., data types); and ways to access MySQL servers using multiple clients.
The fifth chapter shifts focus to using the language of SQL to manipulate databases in meaningful ways. The chapter provides lessons on how to create databases and tables; how to insert records; how to select data; how to use conditionals; how to use flexible conditionals (e.g., LIKE and NOT LIKE); how to sort and limit query results; how to update and delete data; and how to use functions.
The ninth chapter revisits PHP, which was introduced in Module 2 of this course, and shows how it can be used in combination with MySQL to create dynamic pages that can interact with databases. The chapter covers how to use PHP functions to (1) connect to a MySQL database; (2) execute queries (with data from an HTML form); (3) retrieve and display query results; (4) ensure database security; and (5) update database records.
Below are three sample pages that demonstrate the possibilities of integrating MySQL and PHP to create dynamic pages.
Example: Registration Form
The first example shows how PHP can accept data submitted from an HTML form, connect to a MySQL database, validate that data, and then add that data to a table.
Here, we have a registration form designed for a user to create an account by submitting their first name, last name, email address, and password. As shown in multiple examples in Module 2, the form is created in HTML and uses the POST method to make the submitted data available for PHP. The PHP script begins by checking for how the script is requested–in this case, POST. It then creates a connection to the MySQL server and selects the database with the mysqli_connect function. Next, it validates the data submitted from the HTML form and uses the mysqli_real_escape_string function to ensure the data is syntactically valid (i.e., making sure that potentially problematic characters are properly escaped). Finally, the validated data is then added to a table in the database via the mysqli_query function, which takes two arguments: the database connection and the query. Here, an INSERT statement is used for the query because data is to be added to the table.
The example may be previewed below or viewed in a separate tab/window here.
Example: View Users
The second example demonstrates how PHP can also be used to retrieve database query results and display the data.
As in the previous example, a connection to the MySQL database must initially be established using the mysqli_connect function. Next, a query using the mysqli_query function (with a SELECT statement used for the query) is made to return all users' names and their registration dates. Then, the number of returned records is counted using the mysqli_num_rows function. If the number of returned records is greater than zero, then the returned records are fetched as arrays using the mysqli_fetch_array function and printed row by row. The final HTML output is a two-column table that displays all users' names and their registration dates.
The example may be previewed below or viewed in a separate tab/window here.
Example: Change Password
The third example illustrates how PHP can accept data submitted from an HTML form, connect to a MySQL database, validate that data, and then use that data to update database records.
Here, we have a form designed for a user to change his account password by submitting his email address, current password, and desired new password. Like in the first example with the Registration Form, the form is created in HTML and uses the POST method to make the submitted data available for PHP. The PHP script begins by checking for how the script is requested–in this case, POST. It then creates a connection to the MySQL server and selects the database with the mysqli_connect function. Next, it validates the data submitted from the HTML form and uses the mysqli_real_escape_string function to ensure the data is syntactically valid (i.e., making sure that potentially problematic characters are properly escaped). Then, a query is run to retrieve the user's ID by using the user's email address and current password in a WHERE clause to filter the records. After the relevant record has been retrieved, another query using an UPDATE statement is run to change the user's password.
The example may be previewed below or viewed in a separate tab/window here.
Zend: PHP 101 – Week 11 (04/03/2017)
PHP 101 by Zend is a series of web tutorials created for PHP beginners. Many lessons cover familiar ground from Module 2 of this course, such as Part 5's review of using PHP to interact with external files. However, some material is new, such as Part 8's introduction to integrating PHP with MySQL. Parts 5 and 8 are discussed in greater detail below, and each part also includes a sample page that illustrates the material covered in the respective tutorials.
Part 5: Rank and File
Part 5 revisits using PHP to interact with external files, a concept already introduced in Module 2's YouTube tutorials by Eli the Computer Guy. However, multiple ways of interacting with files are presented here. One way is using the familiar file_put_contents function shown in Eli the Computer Guy's tutorials; it takes a string and writes it to the file specified in the argument. Another way is using a combination of the fopen (which opens an external file), fread (which reads from an external file), and fwrite functions (which writes to an external file). This tutorial also introduces many functions that return various pieces of information about an external file's status (e.g., is_readable, filesize, and fileperms).
Below is an example that shows how to use PHP to read the plain text contents of an external file and then quickly convert that text to HTML.
Example: Breaking Eggs
Here, we have a recipe originally written in plain text. Although reentering and reformatting the text line by line is an option, a faster and easier way of HTML conversion is demonstrated here. First, the text file is read into an array. The first line of the file–the name of the recipe–is then assigned to a variable. Next, the array_shift function is used to remove the first element of the array, effectively stripping the first line. The first line is printed separately with appropriate header tags, and a foreach loop is then used to cycle through the array and print each element while also using the nl2br function, which converts text line breaks into HTML <br> tags.
The example may be previewed below or viewed in a separate tab/window here. The external file containing the recipe in plain text format may be viewed in a separate/tab window here.
Part 8: Databases and Other Animals
Part 8 explores how PHP and MySQL can work in concert to develop dynamic pages capable of interacting with databases. The material here is largely review and a variation on the ideas and concepts introduced in Chapters 5 and 9 of PHP and MySQL for Dynamic Web Sites. It is worth noting, however, that this lesson shows a slightly different way of establishing a connection to the database server and selecting a database.
Below is an example that demonstrates how an HTML form can send data to a PHP script, which in turn connects to a MySQL database server and uses the data to update a table in the database. The updated table is then retrieved by the PHP script, and the results are displayed for the end user in a familiar HTML format.
Example: Animal Magnetism
In this example, we have an HTML form that allows a user to enter the name of a country and animal. The data is then submitted to a PHP script that connects to a MySQL server and inserts the data into a table via the mysql_query function. The script then checks to see if any rows are changed, and if so, it prints the table row by row. The form also contains a "Delete" link for every displayed row, allowing the user to click it and delete the record from the database. This is accomplished with a query passed by a PHP function, as well.
Note that the inclusion of the AUTO_INCREMENT keyword for the ID column results in deleted IDs disappearing forever. In other words, every new record contains a unique ID that has never been used before and will never be used after, even if the record is deleted.
The example may be previewed below or viewed in a separate tab/window here.
W3Schools – Week 11 (04/03/2017)
The SQL tutorial on W3Schools provides a review of SQL, a language that is used "for storing, manipulating and retrieving data in databases." The tutorial primarily covers SQL commands, clauses, operators, and keywords and points out the syntax differences across various database systems. The fundamentals of the language are taught, including SELECT, WHERE, AND/OR/NOT, ORDER BY, INSERT, UPDATE, DELETE, LIKE/NOT LIKE, CREATE, as well as multiple functions. Some of the more advanced features of SQL, initially touched on in the Bucky Roberts tutorials, like JOIN are also covered.
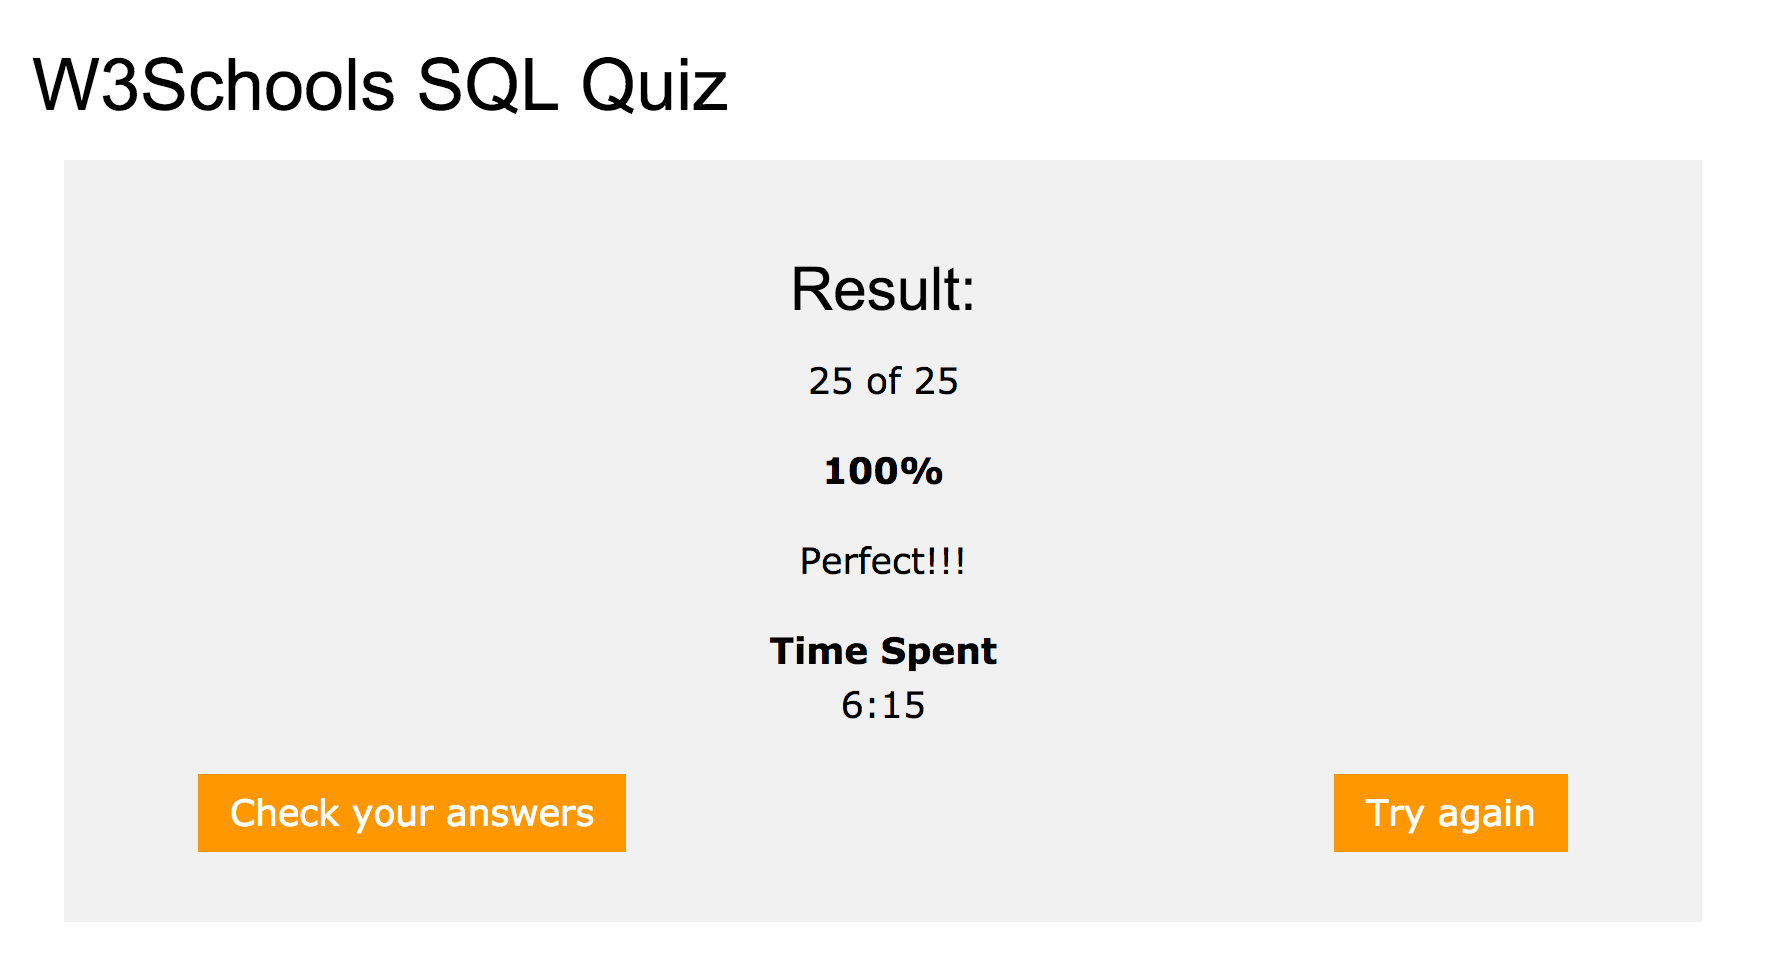
Below is the result from the W3Schools quiz, which demonstrates that I possess basic knowledge of SQL (click thumbnail to view full size image).